Me n’ Martha Project: Day 24, Cobb Salad

Today I took the culinary road trip out West for one of my personal favorites, a Cobb Salad from page 361.

I had never known that the Cobb salad originated in the West.  Back in the days I worked on Wall Street, I used to order the Cobb salad from a popular chain restaurant that shall remain nameless to protect the guilty.  I had no enthusiasm for this particular chain, but it was close to my job and I had friends who liked to go there for the watered down drinks after work.  The description in the menu always cited the avocados as part of the dish, and as you might be able to tell from how much I use them, I love avocados!  The first time I ordered it, there were no avocados, so I told the waiter that there was a mistake, his reply was a curt “We’re out of avocados.”  So I said I wanted to order something else – the waiter stormed off angrily to the kitchen and returned with a small cup of avocados that he slammed down on the table in disgust!  After that I’d always order the Cobb salad there and we’d always play out the exact same scene – it became a kind of twisted game!  I figured it out rather quickly, you see, that avocados are somewhat pricy and the restaurant must have had a policy not to use them, even in the dishes that were supposed to have them.  Most people must have not cared, or have been too drunk after their third huge watered down cocktail to notice — but not me, I would fight tooth and nail for that avocado each and every time I ate there!  Hey, if I order steak at a restaurant, I don’t want them to charge me for it but give me a big plate of red beans because that’s a cheaper way to do business and in principle the avocados in my Cobb salad is the same thing.  Ah, what delightful memories I have of that place!

This salad is delicious and simple to make while also being attractive enough to serve at a dinner party.  Martha mentions that in the spirit of the original salad named for Robert Cobb of Hollywood’s Brown Derby restaurant — where he created it for late night service using leftovers — we should feel free to improvise the ingredients based upon what we have in our kitchens.  That’s pretty much what I do with most of these recipes, as I use them for inspiration while also bending them to my taste, budget and ingredient availability.  I didn’t have watercress, so I left that out and I added some sliced mushrooms – but you can be sure  I used plenty of avocados!

Posted in Uncategorized | Comments Off on Me n’ Martha Project: Day 24, Cobb Salad

Me n’ Martha Project: Day 23, Buttermilk Fried Chicken

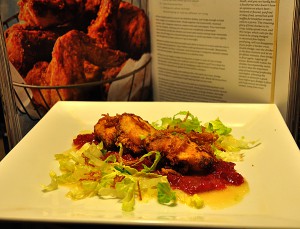
Buttermilk Fried ChickenToday I did a southern classic and dressed it up with a modern twist.  I took Martha’s Buttermilk Fried Chicken recipe from page 187, but I made it with chicken breasts and used them as the centerpiece of a salad.

I know this has the potential to make almost everyone angry at me!  Devotees of traditional southern fried chicken could be taken aback at the audacity of ripping it away from its comfort food roots that are intended to be enjoyed with sides like buttermilk biscuits, gravy and mashed potatoes.  While advocates of healthy eating tend to avoid any frying at all and typically suggest baking and grilling as the best way to lighten up fat and calorie rich dishes.

That’s why I wanted to unite a crispy and decadent fried chicken with healthy and nutritious fruits and veggies into one flavor packed meal!  Because I believe there’s no one “right” way to eat.  Frying gets a bad rap!  When food is fried right it should be light, with just the perfect amount of crispiness.  When fried food tastes heavy and greasy it means it wasn’t fried well.

I followed Martha’s fried chicken recipe closely, except for using only the breast instead of a whole fryer chicken.  Then I made a drunken fig jam from fresh figs right off the tree (yes, I am pretty lucky to have my own fig tree!)  I cut up some romaine hearts of lettuce; made a lemon/jalapeño vinaigrette dressing, and topped it all with some crispy fried shallots.  The tender fried chicken merged perfectly with all the hot, sour and sweet elements!

Jeff has lost over 100 lbs over the last two years and he looks and feels better than ever!  He’s struggled with his weight most of his life and he’s tried every deprivational diet in the book; diets that would take the weight off quickly and leave him heavier and sicker in the long run.  It’s only after he stopped counting every calorie, and carb and gram of fat that he learned he could eat well and also be truly satisfied – and that’s when the weight came off in a healthy way.  He inspires me to always find new and exciting ways to cook healthy food while never, ever sacrificing flavor in the process.

Posted in Uncategorized | Comments Off on Me n’ Martha Project: Day 23, Buttermilk Fried Chicken

Me n’ Martha Project: Day 22, Iced Sugar Cookies

Today I decided to try my hand at an All-American favorite, Iced Sugar Cookies from page 59.  I also saw this as the perfect excuse to try out Martha’s cake and cookie decorating stencils that I picked up earlier today at my neighborhood crafting store.

The cookies are so simple to put together!  It’s basically butter, sugar, eggs and flour – ingredients most of us always have around the house.  The dough needs to chill before you roll it out and cut the cookies, and then you need to refrigerate it for about a half hour on the baking sheet because this helps them keep their shape.

I made the Royal Icing from page 414, but instead of using food coloring, I whipped out the stencils and decided to try using them with colored sanding sugar…there’s only one problem, the online tutorials I watched all made clear you’re really supposed to use these stencils with icing, not sugar…oops!

But I’m not one to let something like that interfere with my creative process so I tried it anyway to mixed results.  My earliest tries were downright comical, and I ended up just making them into abstract, tie-dye style cookies; covering my failed stenciling with different colored sugars all around.  My later attempt, as you can see from the pictures, had mixed results…kind of cute, but not very professional.  Still, I had a lot of fun with these!

This is the kind of cookie dough recipe every home baker should work with because it’s very versatile and good for any kind of party.  You can keep them round or use cookie cutters with festive shapes.  I’m looking forward to trying these cookies again and I’m also looking forward to becoming a pro at working with Martha’s adorable decorating stencils.

Posted in Uncategorized | Comments Off on Me n’ Martha Project: Day 22, Iced Sugar Cookies

Me n’ Martha Project: Day 21, Not Venison Chili

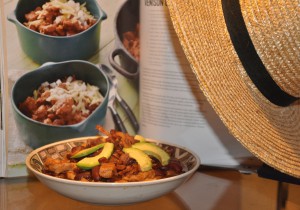
Today I took my kitchen road trip out to the wild, wild west and made some venison chili from page 387…except I didn’t use venison, so this is my Not Venison Chili!

Now you might be wondering how you make a dish called venison chili without the venison.  It’s simple, you substitute another protein for the venison, in this case, I used pork.  Now I happen to love venison, it has a very unique and complex flavor, and it also has the advantage of being both low in fat and wonderfully tender – an exceedingly rare combination.  The problem is that it’s not easily accessible, and that makes it prohibitively expensive for me to purchase since I need to shop on a tight budget.  I want Martha’s American Food to be embraced by everyone who loves cooking and eating good food, whatever your budget happens to be.  That’s why I thought this would be a good recipe to modify to my budget, while preparing it very closely to her recipe in order to get all those awesome flavors and textures – and it was a smashing success!  Other than using the pork, I made a few minor modifications to the recipe.  I left out the red pepper flakes and added an Anaheim pepper and a shot of sriracha.  I added a tablespoon of brown sugar because when I’m making something spicy and acidic, I like to balance it with a little bit of sweetness.  Instead of cooking the crispy bacon with the rest of the chili, I used it as a topping along with sliced avocado.

Living on a budget doesn’t mean you need to eat only processed and fast food.  Fresh vegetables aren’t hard on the wallet, and if you can budget in some less expensive proteins like chicken, pork and certain cuts of beef like top round, you can eat healthy and eat well at almost any income level.  I’m hoping that when we’re a little more financially secure I can try this recipe again using venison because I’m sure that would be beyond amazing, but this was a great dinner and we hardly felt deprived eating it down to the last drop!

I must add that my husband Jeff, the chili connoisseur, is torn between this and Martha’s Texas Chili as his favorite chili of all time.  We’ve been doing chili one way for many years…and don’t get me wrong, that way is tasty too…but it’s exciting for us to use this book to come up with new ways to prepare our favorite dishes with a little Marthaesque flair!

Posted in Uncategorized | Comments Off on Me n’ Martha Project: Day 21, Not Venison Chili

Cooking School 101: All About Meringues, Pt. 1

Recently, I’ve been saying a lot about the trials and tribulations of making meringues.  It occurred to me that while most of you know what a meringue is because you’ve probably eaten it before in something like a lemon meringue pie, some of you might not know a lot about making them.  That’s why I wanted to give you an overview of the art of the meringue that you might find helpful.

Meringues can be scary.  Many a cook, even a skilled cook, has come to grief in attempting the mighty meringue.  So here are the issues:

  1. You need to mix meringue in a non-reactive metal bowl, in other words, a bowl that doesn’t chemically interact with your ingredients.  Plastic is NOT good, as it can hold fatty particles in its pores.   The exception is copper, which is reactive, but in the case of egg whites it’s a very good reaction; it’s actually the best type of material for whipping a meringue because it will whip your egg whites faster and more stable, unfortunately it’s also very expensive, one big bowl can cost as much as $100.  Stainless steel is the best affordable bowl to whip meringue in; the bowl on a Kitchen Aid Stand Mixer is stainless steel.
  2. Since meringue entails using only the egg whites of the egg, great care must be taken in separating yolk from white.  I recommend holding the yolk (which contains fat) in your hand, and letting the white drop off.  Any contact with any fat can destroy the meringue.  Clean hands are a must, wash thoroughly with a disinfectant soap and hot water both before and after breaking your eggs.
  3. Egg whites are easily cooked, and premature cooking also destroys the meringue.  Thus when combining the whites with other heated ingredients, particularly sugar, the utmost care must be taken in making sure that they are within the correct temperature range.  Remember, even if hot sugar is at the correct temperature, and you turn off the burner, heat from the burner, or even from the bowl or pot itself, will continue to raise the temperature.
  4. An under-whipped meringue will be runny and lifeless, but an over-whipped meringue will be clumpy and grainy, so you need to get it just right.  The best way to judge is by sticking the tip of your whisk in the meringue, if it’s firm enough to stand on up on it’s own with just the tip curving over, it’s done.

There are three basic types of meringue:  French, Italian and Swiss.  They all begin with raw egg whites that you’ll need to whip into a creamy mass that will become much larger than the liquid you started out with. But that’s where the similarities end.  So for now, let us start with the French, the simplest of the trio.

French Meringue:  You start out whipping the egg whites until they become frothy, at that point slowly add in sugar as it’s whipping, and continue to whip until it forms stiff peaks.

Because the egg whites are still raw, this type of meringue is meant to be baked after it’s prepared.  It’s often piped onto a pan with a pastry bag and baked into a pastry shell, or a type of cookie that has a creamy, crunchy texture that should melt in your mouth when you eat it.  If it tastes grainy or cottony, it means your eggs were likely whipped too long.

Stayed tuned for Part 2, where we’ll get into the Italian Meringue, which is cooked.  That one’s a bit more complicated.

Posted in Uncategorized | Comments Off on Cooking School 101: All About Meringues, Pt. 1

Me n’ Martha Project: Day 20, Skillet Cornbread

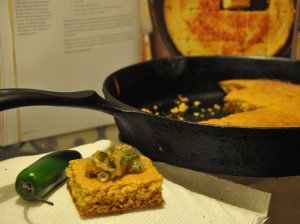
Today took off to the Southwest and did up a skillet cornbread from page 322.

Jeff and I really enjoyed this recipe.  In fact, Jeff liked it so much he said “I like Martha’s cornbread recipe better than yours!”  I can’t help but wonder why men say things like that when their wives are within inches a of big, heavy cast iron skillet?  Ah, but I jest!  This is better than my cornbread recipe and I’m woman enough to admit it.  I did get a bit creative with this cornbread.  I added some extra spices to the batter, a little cayenne and some freshly grated ginger.  Instead of adding jalapeños directly to the batter, I did up a topping of caramelized onions and jalapeños; by caramelize, I don’t mean I simply browned them, I cooked down them with some butter and about a tablespoon of sugar until it had a nice brown, sugary glaze, threw in the jalapeños in the last few minutes and deglazed the pan with a splash of orange liqueur.  The topping was sweet and spicy and the cornbread had subtle tang and a fantastic texture!

The book notes that this skillet cornbread is traditionally served with a Southwestern barbecue.  I think that would also make a perfect accompaniment for a big brunch with a western omelette, strong espresso and some spicy bloody marys.  Mmmmm…that sounds good, I’m going to have to try that sometime soon!

Posted in Uncategorized | Comments Off on Me n’ Martha Project: Day 20, Skillet Cornbread

The Me n’ Martha Project: Day 19, Philadelphia Cheesesteak

I’m must start this post by saying that Philadelphia is one of my favorite cities in the nation!  World class art + world class cuisine = Happy Rose!!!  I’ve had some of the best meals of my life in Philadelphia, and this is coming from someone who spent the first 40 years of my life eating my way around NYC, so that’s quite a compliment.

And I do consider a great Philly cheesesteak to be one of life’s finest foods!  I don’t really want to delve into the whole California fois gras controversy, except to say that I’m not a big fan of the government telling people what they can and cannot eat, but on my budget, fois gras never finds itself on my grocery list so I don’t have a personal connection where it’s concerned.  But I’m warning those PETA activists now that you’ll take my Philly cheesesteak from my cold, dead hands!

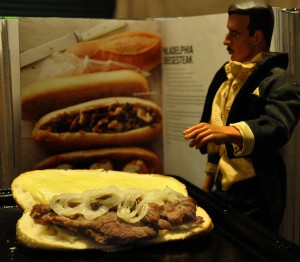
Martha’s recipe on page 103 of the Northeast section is ridiculously simple to make!  All you need is top round steak, onions, some provolone cheese, and a soft hoagie roll and you’re good to go!  There are actually two different cheeses to choose from with the traditional Philly cheesesteak, one is provolone, as this recipe calls for, and the other is Cheez Whiz…yes, the dreaded Cheez Whiz.  I’ll admit that when in Philadelphia, I tend to opt for the Cheez Whiz, because while it’s not actually a real food, it sure does taste pretty darn good on a Philly cheesesteak…I hope that Martha will not hold this against me!  But true to her recipe, I used the provolone and it was scrumptious!  This is just one of those simple meals where all the elements work together and Martha’s recipe pays homage to it without trying to reinvent the wheel, so to speak.  I should have kept my onions on a bit longer and let them really caramelize, but a few pieces were starting to burn and I was getting worried about burning the whole thing, so I pulled them too soon.  They were still very fragrant and sweet, but unfortunately, not quite the traditional cheesesteak onions.  The recipe called for olive oil, which I used, but olive oil has a low smoke point and tends to cause this kind of problem so I personally find it best to use an olive oil/canola blend whenever I’m cooking something that takes more than 5 minutes to make.

Should you have the privilege of being in Philadelphia here’s some tips for ordering a their famous cheesesteak — skip the greetings, the guys behind the counter really hate small talk about how excited you are to try their cheesesteak; just tell them how many you want, provolone or Cheez Whiz, and with or without fried onions.  So if you want one with Cheez Whiz and no fried onions, just say this:  “One, whiz, without.”  That’s it.  Trust me, this will save you from the indignity of being scowled at by the guy at the counter, unless of course, being abused by a counter guy at a Philly cheesesteak stand is the kind of thing you’d consider a fun story to tell your friends back home about, in which case I suggest you also ask a lot of questions about which style they think is best and how long they’ve been in this line of work!

Posted in Uncategorized | Comments Off on The Me n’ Martha Project: Day 19, Philadelphia Cheesesteak

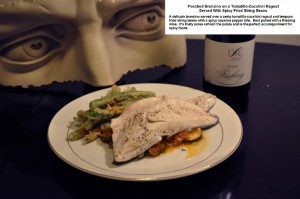
Poached Branzino On A Tomatillo-Zucchini Ragout Served With Spicy Tempura String Beans

Ingredients for the
Tomatillo-Zucchini Ragout

12 tomatillos
6 plum tomatoes OR one 8oz can of diced plum tomatoes
1 onion, small dice
3 cloves garlic
2 T extra virgin olive oil
1 T sugar
1 bay leaf
2 T water
4 zucchini, thinly sliced
Salt and freshly ground pepper

Ingredients for the Branzino

8 Branzino filets
Salt and freshly ground pepper
4 oz white wine
1/4 cup water
10 black peppercorns

Ingredients for the Spicy Tempura Green Beans

1 cup flour
1 cup seltzer
1 egg
6 oz string beans
Cayenne pepper, to taste
Salt, to taste

Preparing the Tomatillo-Zucchini Ragout

  1. Remove the tomatillos from their husks.  Cut them into quarters.
  2. Score the bottom of the plum tomatoes with a paring knife.  Place the plum tomatoes in boiling water, remove them within 30 seconds, peel off the skin, remove the seeds and then finely chop the flesh. (Please note that you can also use canned diced tomatoes and skip this process if you prefer)
  3. Dice the onion.
  4. Crush the garlic cloves and dice finely
  5. In a small saucepan, sweat the onion in half of the olive oil.
  6. Add the garlic.
  7. When the onions and garlic are soft but have not achieved any color, add the quartered tomatillos, the tomatoes, a bay leaf and the sugar then cover with a parchment paper lid.  Allow to simmer until all moisture is removed, remove the bay leaf and set aside.
  8. Heat a small saute pan and add the rest of the oil.  Add the zucchini to the pan and season with salt and pepper.  Saute until soft and lightly browned.  Add the zucchini to the tomatillo sauce and set aside.

Preparing the Branzino Filets

  1. Season the filets with salt and freshly ground pepper.
  2. In a medium size pan, add the white wine, water and black peppercorns, allow it to come to a soft boil.  Lower the heat to a gentle simmer and add the filets.  Allow to cook for about 6 minutes, being careful not to overcook.

Preparing the Spicy Tempura String Beans

  1. Cut the stems off the string beans.
  2. Mix together the egg, flour and seltzer and whisk lightly to form a tempura batter.
  3. Dredge the string beans in the batter.
  4. Heat a deep fryer to 355 – 365 F and fry the string beans for about 1 minute or until they form a golden brown crust.
  5. As soon as they are removed from the fryer, dust the string beans with cayenne pepper and salt.

To Serve:

  1. Place the tomatillo-zucchini ragout in the middle of a plate with a serving spoon.
  2. Place the branzino filet on top of the ragout.
  3. Arrange the string beans on the side of plate beside the branzino.
Posted in Recipes | Comments Off on Poached Branzino On A Tomatillo-Zucchini Ragout Served With Spicy Tempura String Beans

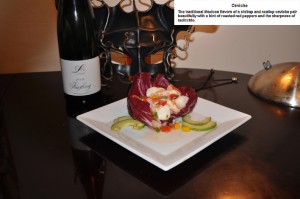
Ceviche Served in Radicchio

2 lbs shrimp
2 lbs scallops
6 limes
2 lemons
1 plum tomato, diced
1 small yellow onion, diced
1 green sweet pepper, diced
1 banana pepper, diced
1 jalapeno pepper, small dice
4 oz roasted red peppers, cut in small strips
1 T extra virgin olive oil
Salt and freshly ground pepper, to taste
32 radicchio leaves, washed and left whole (about 4 radicchios)
4 avocadoes, cut in wedges, for garnish (optional)
Cilantro or parsley, finely chopped, for garnish (optional)

Preparing the Ceviche

  1. Clean the shrimp and remove the veins.
  2. Clean the scallops and remove the beards.
  3. Squeeze the juice from the limes and lemons into a non-reactive bowl.
  4. Gently mix the scallops and shrimp into the bowl with the lemon/lime juice and refrigerate for 1 hour.
  5. Mix together the rest of the ingredients, except for the avocadoes and the herbs.
  6. After the shrimp and scallops have marinated for one hour, add the vegetable mixture to the bowl.
  7. Allow to refrigerate for at least 3 hours.  The ceviche is done when the shrimp turn opaque.
  8. Wash the radicchio leaves.

To Plate:

  1. Place 4 radicchio leaves in the center of the plate, carefully arrange them so that they look like a flower.
  2. Spoon the ceviche into the radicchio leaves.
  3. Garnish the sides of the plate with the avocado slices.
  4. Sprinkle with the chopped cilantro or parsley.

Serves 8

Posted in Recipes | Comments Off on Ceviche Served in Radicchio

Me n’ Martha Project: Day 18, Key Lime Pie

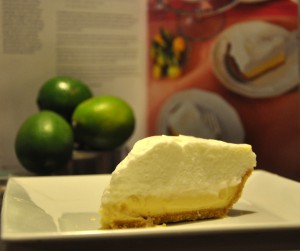
The sun finally came out again today, so I took off to the store and got everything I needed to make a Key Lime Pie a/k/a The Official State Pie Of Florida!

According to the story I read on page 206 of the southern section, a real Floridian will always know the difference between a true key lime pie and some pie you try to pass off as one using ordinary, pedestrian limes.  So I used real key lime, but I had to buy it in a bottle, because even here in Florida, those little green culinary gems are hard to find!  This made putting together the filling a piece of cake…or in this case, pie…you get the idea.

Of course, the topping required yet another go at a meringue…sigh…but something interesting happened…having made meringue three times in the last four days I’ve actually become something of a pro at it now!  You may have heard the saying about how the definition of madness is doing the same thing over and over again and expecting different results.  There could be some kind of existential truth to that in many life instances but not where cooking is concerned, because the secret to becoming a great cook lies in a willingness to do the same thing over and over again until you get it right.

This key lime pie was dreamy!  Tart, yet sweet, with the perfect light and creamy topping.  I think that both Martha and my new home state of Florida would be proud of me!

Posted in Uncategorized | Comments Off on Me n’ Martha Project: Day 18, Key Lime Pie