Me n’ Martha Project: Day 32, Chicken and Dumplings

I have found that since I’ve moved down to Florida, I’ve become more interested in southern cooking. It’s a way of getting to know my new home better by exploring the local cuisine and learning how to cook it properly.  So it made sense to try Martha’s Chicken and Dumplings recipe from page 191.  In fact, when I went to my local farmers market earlier to buy vegetables and told the proprietor of my plans to make chicken and dumplings, her eyes lit up and she (half) jokingly asked me to come by the next day and bring her some leftovers.  This is definitely a true southern favorite!

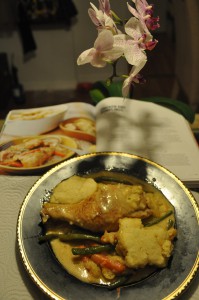
For this recipe, I mostly stuck to Martha’s ingredients, adding only a touch of fresh sage from my garden, but I cooked it a bit differently in that I used my big cast iron pan for the whole thing.  The reason I did this is because I’m only cooking for myself and Jeff, so my portions are a bit smaller, and also because I really like to use the cast iron pan for things like browning up chicken and onions as I think it cooks up more evenly.  I did run into a bit of a problem by the time I dropped my dumplings into the pan, there was not enough room left for a lid to fit properly…so I put the whole thing in a 400º oven for about 10 minutes.  That did the trick and the dumplings puffed up beautifully.

This dish was amazing — one of my favorite so far!  The gravy was creamy and the seasonings were sublime.  The dumplings were about the best I’ve ever had and the chicken was perfectly tender.  The carrots and string beans and onions were the perfect vegetable medley for this dish.  In fact Jeff said that he’d eat this even without the chicken, and that’s saying a lot because he’s the anti-vegetarian…15 years married and I’ve never seen him eat a meatless dinner, so coming from him that’s the ultimate compliment!

Martha’s chicken and dumpling recipe is truly southern comfort cooking at its best!

Posted in Uncategorized | Comments Off on Me n’ Martha Project: Day 32, Chicken and Dumplings

Me n’ Martha Project: Day 31, Waldorf Salad

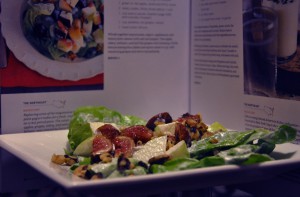
Since I made a fig pizza yesterday I found myself with plenty of extra pizza dough.  Tonight I decided to go for a New York style pizza with marinara sauce, mozzarella cheese and pepperoni and have it with a classic NYC Waldorf Salad from page 94.

This salad was so simple to make, with only a few ingredients that gave it a very distinct sweet and sour flavor.  The dressing is lightened up a bit with the addition of plain yogurt with the mayonnaise and just a hint of apple cider and lemon added.  Toasting the walnuts enhanced their sweet and nutty flavors and added a nice texture to the whole salad.  Instead of red grapes, I used figs because as I’ve mentioned, my fig tree has left me with an abundant harvest and I need to come up with new ways to use them every day!

The whole meal made me a little homesick for New York — I just wish I could meet my best friend for cocktails down in Greenwich Village and walk up to Midtown with her like we used to do almost every week. But at least with a homemade pizza and this Waldorf salad, I can have a little taste of NYC right here in Florida.

Posted in Uncategorized | Comments Off on Me n’ Martha Project: Day 31, Waldorf Salad

Me n’ Martha Project: Day 30, Fig Pizza

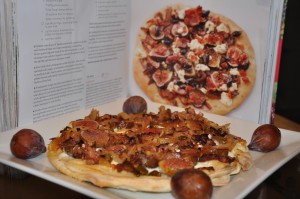
Today I decided to try something I’ve never had before — Fig Pizza, which comes out of the West and can be found on page 364.

Pizza dough is a wonderful blank canvas to express your creativity in whatever way you want!  It may have originated in Italy, but we Americans have truly made it our own. You can put everything from the old standard of pepperoni to pineapples, to figs on top of your pizza.  Right now, my fig tree is harvesting many delicious ripe figs and I need to find ways to use them, so this was a terrific way to put those plump, sweet, juicy figs to use while trying a new and exciting recipe.  This recipe also had pancetta, which is often called the Italian bacon, but I don’t think that characterization does it justice.  Pancetta, like bacon, is made from pork belly, but while bacon is smoked, pancetta is dry cured in salt and various spices and aged for several months.  It has a very distinctive flavor that’s both richer and more delicate than bacon.  The pancetta compliments the figs in special way that you won’t get with bacon, so while this pizza would still taste great if you had to substitute, I highly recommend that you try to get your hands on some pancetta for this if you can.  However, in the future I would like to try substituting the ricotta cheese with chèvre because I think its acidic qualities would balance quite nicely with the salty and the sweet flavors.

A note on making pizza dough (which I plan to expand on in a future Cooking School 101 post).  More than most recipes, doughs for things like pizza and pasta are highly impacted by the humidity level of your kitchen, and even the state you live in.  Meaning in drier air you need a lower flour ratio to your wet ingredients and moister air requires a higher flour ratio.  So if you’re making your own pizza dough and add the flour that the recipe calls for and what you’re left with is the consistency of sticky glue it means you need to keep adding flour a cup at a time until it’s the right consistency.  If you’re using a stand mixer with a hook attachment, your dough is done when it starts to come together and form a ball on the lower part of the hook.

This was a delicious pizza and a great new recipe to try as I celebrate the first month of the Me n’ Martha project!

Posted in Uncategorized | Comments Off on Me n’ Martha Project: Day 30, Fig Pizza

Me n’ Martha Project: Day 29, Pigs In A Blanket

It’s hard to believe I’m approaching one full month of my experiment in extreme Marthaosity!  Although I’ve been cooking most of my life and moved up to a professional level after I graduated from The French Culinary Institute, this is the first time in my life I’ve worked one cookbook this consistently.  I’ve used cookbooks in the past, my favorites being Julia Child’s Mastering the Art of French Cooking (a must for any serious student of the culinary arts) and various books by my idols, Emeril Lagasse and Alton Brown.  Still, this is a different type of focus.  I think I started this a bit tongue in cheek, but as the month has moved on I find myself taking it more and more seriously by the day…which brings us to the oh-so-serious topic of Pigs In A Blanket, from the Midwestern section on page 234.

Ah, pigs in a blanket, it’s hard to even say the name without chuckling a little bit!  This is an easy one to make; get some cocktail wieners, wrap them in pastry dough, give them a touch of egg wash and put them in the oven — and voila — you have a tasty snack that’s perfect for a game day party or a fun after school treat for the kids.   These really brought me back to my childhood when my grandmother only made them for parties so they were really a special treat for me!  The only change I made from Martha’s recipe was to omit the poppy seeds because they’re tough on my teeth.  This recipe was super simple and so much fun to eat!

The reason I haven’t burned out on Martha’s American Food is its diversity.  In a matter of days I can go from salads, to desserts, to dinner fare, to comforting nostalgic appetizers like pigs in a blanket…how can I get bored?

Posted in Uncategorized | Comments Off on Me n’ Martha Project: Day 29, Pigs In A Blanket

Me n’ Martha Project: Day 28, Fajitas

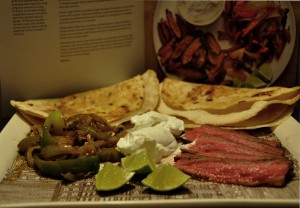
Today I did a Southwestern favorite, Fajitas, from page 310.

An interesting thing in exploring the American food featured in Martha’s book is getting to know its rich history.  Fajitas are served in both Mexican restaurants and American diners.  They are classic Tex-Mex fare, created by Mexican vaqueros (cowboys) who were given the inexpensive cuts of beef as part of their pay.  A wonderful example of ingenuity and creativity in the face of harsh working conditions.  America is truly a melting pot and this is reflected in its eclectic, multi-cultural cuisine.

This was the first time I ever made fajitas at home.  Martha’s recipe is simple and flavorful, dispensing of typical toppings like guacamole and shredded cheddar cheese so that you’re left with a traditional dish of steak, sautéed onions and peppers that’s wrapped in a tortilla and topped only with sour cream.  I liked that simplicity because I sometimes find that if you pile on a lot of different toppings you lose the essence of the main attraction, in this case the beef.  Food combinations should compliment and elevate each other, and too often we overdo it to the point where they instead fight and diminish each other.

I consider this the kind of dish you can tweak a bit to your personal taste, so I played a little with the seasoning for the steak, adding just a little bit of Jamaican curry and Chinese allspice to the steak rub.  I didn’t have red peppers so I used green, and I also added a few small tomatillos.  Then I let my tortillas get a little bit browned and crispy so that they had a little crunch.  Yum!  This is a great meal to make on a budget, in the spirit of the vaqueros, you can use the cheaper cuts of beef and still have a delicious meal!

Posted in Uncategorized | Comments Off on Me n’ Martha Project: Day 28, Fajitas

Me n’ Martha Project: Day 27, Shoofly Pie

Today I made a Shoofly Pie, from the Northeast section on page 142.

The story that came with this pie was interesting.  This pie comes from the Pennsylvania Dutch Country and it’s an early American example of what is now known as fusion cuisine.  The molasses filling is borne from traditional English style and its streusel topping has distinctly German roots.

I’ll be honest and let you know that I had never heard of a Shoofly pie before I saw it in Martha’s book, and I didn’t think I’d like it very much because I thought it would be too sweet for my taste.  Still, I always enjoy the adventure of trying something new and different.

To my surprise and delight, I really loved this pie!  The buttery streusel topping compliments the molasses filling and creates a very unique flavor profile.  If this pie didn’t have the streusel topping, I don’t think I would like the molasses filling on its own.  The reason why is that molasses isn’t merely a liquid sugar, it goes through a complex chemical process that leaves it with a slightly bitter and harsh aftertaste, however it works in this pie because the streusel elevates the taste to a different level, and the hard edge of the molasses brings something new to the streusel that it doesn’t have when sitting atop an ordinary coffee cake.  I made only two changes to the recipe:  I added a shot of bourbon to the filling, because it just felt like the right thing to do.  I also added some toasted pecans to the streusel topping, which gave it a terrific crunch.

The picture in Martha’s book has an adorable little boy excitedly clutching the pie…sadly, I didn’t have a little boy around to pose with my pie, so I got Jeff to do it, which is fine because he’s just a big kid at heart!  And I happen to think he’s adorable too!

Posted in Uncategorized | Comments Off on Me n’ Martha Project: Day 27, Shoofly Pie

Because Dressing Up As a Giant Burrito Is Its Own Reward…

There was a time when an unpaid internship was done by college students as a way to gain experience, network and help open doors in professional fields like law, high tech, and financial services.

Apparently those days are over.  See Exhibit 1 in the form of this ad in Philadelphia Craigslist:

GIANT BURRITO MAN OR WOMAN NEEDED (Philly)

NEED 1 PERSON TO DRESS UP AS GIANT BURRITO, RUN AROUND THROWING BURRITOS AT BUILDINGS, OTHER PEOPLE, ETC.

WE PROVIDE THE BURRITO COSTUME AND THE BURRITOS, BUT THIS IS AN UNPAID INTERNSHIP.

GREAT LEARNING EXPERIENCE FOR THOSE INTERESTED IN BURRITO MARKETING.

KEYWORDS: BURRITOS, BURRITO, YUM, MARKETING, AWESOME, SPLAT

I’ll assume this is a great opportunity for people who have some sort of fetish that involves dressing up as and/or throwing burritos.  Either that or someone who has always wanted to break into the dressing up as food and giving out flyers business but was never able to gain the necessary experience to get a foot in the door.

H/T: Endless Simmer

Posted in Uncategorized | Comments Off on Because Dressing Up As a Giant Burrito Is Its Own Reward…

Cooking School 101: All About Meringues Pt. 2, Italian Meringe

Last week, I gave some tricks of the trade on the basics of meringues.  I also described a French Meringue, which is whipped raw and then baked.  This week we’re moving on to an Italian Meringue.  With this meringue, the egg whites are slowly cooked with the addition of sugar that has been cooked to the soft-ball stage and therefore needs no further cooking.

Italian Meringue

Italian Meringue is made by whipping your egg whites while simultaneously cooking sugar to what is known as the soft-ball stage; start with adding just enough water to the pan to make your sugar the consistency of wet sand, it will be at the soft-ball stage when it reaches 234° – 240° on a candy thermometer.  Another way of finding out if your sugar has come to temperature is to get a small bowl with ice water, very carefully* use a spoon to drizzle a drop of the cooked sugar into it, then hold the sugar between your fingers, if you can make a tiny ball with it that you can also squish like putty it’s ready.  If the sugar is hard and breaks, it has overcooked and you’ll need to start over.  If the sugar is too hot it will scramble the delicate egg whites and the meringue will be doomed!

You need to have your whipping egg whites slightly past the frothy stage when you start pouring in the soft-ball sugar.  At that point you slowly and carefully pour it into the egg whites while they whip up at low to medium speed, then you continue to let it whip at medium speed for about seven more minutes until the mixture is cool, voluminous and shiny.

Now, you might be wondering how you time this correctly because that’s where this gets tricky.  It takes about 2 – 3 minutes at medium speed on a typical stand mixer or hand held mixer** to have your egg whites ready for the sugar and if you are using about 1 cup of sugar it should also take about 2 – 3 minutes for it to come to a softball stage.  You will need to be paying attention to both the egg whites and the sugar to get this right!  Here’s a tip – if your sugar is coming up to temperature too fast, add about a tablespoon of water to the pan – this will cool it down and slow the process.  It’s more important that your sugar be the right temperature than if the egg whites are a whipping a little longer than might be desirable.  Also remember that the sugar will keep cooking even after you take the pan off the heat, so once it comes to temperature you want to get it to the egg whites quickly. Once the sugar is added, let it continue to whip on medium high speed for about 7 minutes more until it’s voluminous, shiny and cool.

Italian meringue is often used in making a buttercream frosting.  There are also similar variations, such as a 7 minute frosting, in which some corn syrup is added to the sugar.  If you add a small amount of dissolved gelatin to an Italian meringue after the sugar has been added, you can add some flavor extracts to your own taste, such as almond, orange or cherry, spread it on a sheet pan and cool it overnight for homemade flavored marshmallows!   This is a very versatile meringue and my personal favorite.

*I’m dead serious about the careful part.  Hot sugar can take your skin off and leave you with second degree burns!  I didn’t just read this in a book or get that advice in culinary school.  Unfortunately, I learned about how hot sugar feels when it comes in contact with flesh the hard way!

**Yes, you can whip the egg whites by hand, but I don’t recommend doing so.  If you have strong wrists, then by all means go for it with a French meringue, but it’s very difficult to watch the temperature of the sugar while you’re concentrating on whisking the eggs and even more difficult to pour the sugar in slowly with one hand while you vigorously whisk the egg whites in the other!

Posted in Uncategorized | Comments Off on Cooking School 101: All About Meringues Pt. 2, Italian Meringe

Me n’ Martha Project: Day 26, Asparagus With Prosciutto and Lemon Sabayon

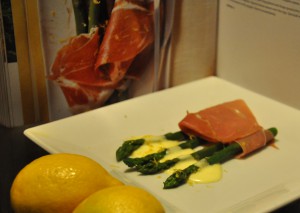
Today I traveled to the West to make Asparagus With Prosciutto and Lemon Sabayon from page 355.

This is a very unique appetizer that contains so much depth of flavor in a small dish.  It’s almost the easiest dish I’ve done since I’ve started the Me n’ Martha project.  I say almost because you do need to do a sabayon, which is a delicate custard that’s traditionally made with Marsala wine as a dessert topping, but for this dish is done as a savory lemon sabayon that’s folded with lightly whipped cream.

My first try at the sabayon was unsuccessful because the egg yolks curdled.  When you’re whisking your egg yolks over simmering water they can go from near perfect to curdled within moments.  That’s why you need to be very careful to watch the temperature, including taking the bowl off the heat periodically to keep the eggs from going to a scrambled, curdled state, while whisking the whole time.  A chef I once worked under gave me some very good advice for these kinds of custards — be it a sabayon, a hollandaise or a bearnaise sauce — every minute or so, touch the bottom of your bowl (which should be stainless steel, unless you’re lucky enough to have a good copper bowl, then use that) if the bowl is very hot to the touch, take it off the heat; if the bowl is lukewarm to cool, place it back over the heat.  The bowl should feel just hot to the touch, but not hot enough to make you go “Ouch!”– that’s the ideal temperature for creating your custard.

After my first sabayon curdled, I tried again, this time more carefully and it came out perfect!  I really enjoyed this appetizer, the elements united in perfect harmony — from the lemony asparagus to the salty, delicate prosciutto and topped with the light, airy sabayon.  This would be a wonderful appetizer to make for an upscale dinner party or even for just an intimate evening with friends.

Posted in Uncategorized | Comments Off on Me n’ Martha Project: Day 26, Asparagus With Prosciutto and Lemon Sabayon

Me n’ Martha Project: Day 25, Blueberry Corn Muffins

Today I needed to embrace simplicity in cooking, because my day has been anything but simple.  Jeff and I adopted an adorable little kitten we named Minnie Mouse!  She’s just about the cutest kitten ever, but it’s a little distracting when your bringing a new kitty into your home for the first time.  Also, my finger was slammed into a car door by accident, which makes things like cooking (and typing up blog posts) more challenging to say the least.  So yeah, it’s been that kind of day, you gotta take the bitter with the sweet…

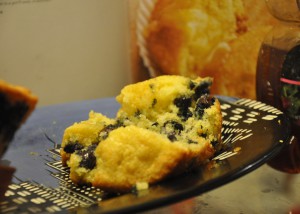
And speaking of sweet, I made a lovely little dessert of Blueberry Corn Muffins!  Martha’s book actually doesn’t have any blueberry muffin recipes, but she does have a corn muffin recipe on page 120 of the Northeast section.  Since I have some wonderful, fresh blueberries, I decided to add them to turn these into blueberry corn muffins.

This is about the best corn muffin recipe I’ve ever tried!  They’re so light, and not cloyingly sweet like some recipes.  The honey is a particularly nice touch and it balanced perfectly with the tartness of the blueberries.  I think I’ll make these again one day as smaller muffins for a brunch with some crispy bacon, poached eggs with hollandaise sauce, buttered toast and wash it all down with mimosas. Can you tell that I’m totally obsessed with brunch?  It’s true, I am, and Martha is always giving me new ideas about how to brunch in style!

Posted in Uncategorized | Comments Off on Me n’ Martha Project: Day 25, Blueberry Corn Muffins